
This post contains affiliate links that help support my blog at no cost to you!
Sewing friends!! I am oh so proud of my latest make!! The new Itch to Stitch Causeway Bomber jacket is probably the most complicated thing I’ve ever made, but nevertheless, after making the muslin, I was able to bang it out over two evenings and a Saturday afternoon. With some patience (and maybe a few glasses of wine!) you can make this awesome jacket too!


About the Pattern
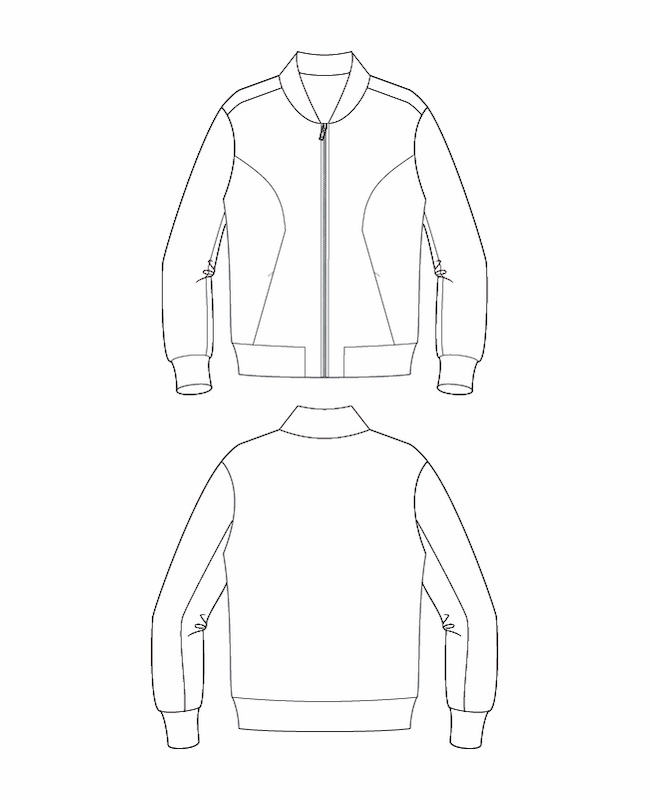
The Causeway Bomber is a fully reversible jacket and comes with an extended size range (women’s 00 – 40), has cup sizes, is designed for non-stretch woven fabrics (plus knit ribbing for the bands), has 4 hidden inseam pockets (with invisible zippers), a reversible center front zipper, and princess seams.


While the instructions are very clear and detailed, I would rate this pattern as advanced due to some complicated construction methods and the need for precise sewing. That said, if you are patient and careful, you can still make this jacket, even if you don’t consider yourself “advanced” (for the record, I usually refer to myself as “intermediate” – there’s always something new to learn, right?!).
I love that Itch to Stitch always makes it easy to blend sizes for the perfect fit. This pattern comes with 2 bodice lengthen and shorten lines (it’s drafted for 5’6″ and in my muslin I added an inch, but for my final I made it the original length – I’m almost 5’8″). I used a size 00 A cup for the bust, blended to a size 6 hip.


The instructions for the invisible zipper installation follow the method Kenneth D. King uses. To simplify them one more step, I used some 1/4″ double sided wonder tape to baste my zippers in, rather than traditional hand basting. Even though I have an invisible zipper foot, I opted to use my regular zipper foot for the installation and it worked perfectly.


About the Fabric
The Causeway Bomber is designed for non-stretch woven fabrics plus ribbing. I found all the fabrics I needed for mine at FabricMartFabrics during one of their recent big sales. The olive is a non-stretch NY Designer cotton brushed fine twill ($6.80 p/y), and the beige is NY Designer cotton/lycra twill ($6 p/y). The ribbing is Michael Kors spun rayon 1×1 rib knit ($4.80 p/y) and it’s WONDERFUL! I’ll definitely be buying more of this if I ever see it again (inventory is mostly all “dead stock” and turns over at Fabric Mart super quickly, so if you see something you like, you need to grab it).


I picked up most of my notions from Wawak – though I ended up paying twice for shipping because I didn’t love the first color zipper I picked out! Why I didn’t just get a bunch of different colors the first time, I don’t know. Oh well, at least I was able to cash in on some other things with each shopping trip! I already had the invisible zippers in my stash, so only needed this reversible jacket zipper ($2.69 + all the other things + $5.89 shipping).
Other notions from my stash include medium weight interfacing (I recommend the interfacings from Fashion Sewing Supply), and stay tape from Emma Seabrooke.


And a tip regarding the stretchy fabrics – when sewing the banding to the rest of the jacket, or if you end up using a stretch woven in your jacket, be sure to keep that fabric against your feed dogs. This will help ensure it doesn’t get all stretched out as the fabric against the feed dogs will move faster than the fabric against your presser foot. I used this same method to ease the jacket sleeve pieces together – rather than adding a line of basting to the under-sleeve, I just put the under-sleeve against the feed dogs and it eased right in. Just remember this rule: when joining two fabrics together, the longest and/or stretchiest piece goes against the feed dogs.

This pattern includes various circles and triangles that need to be transferred to your fabric. I cut a hole in my pattern and then used chalk/a washable marker to do that step. If your fabric is dark, you may prefer to take a needle and thread and make a little tailor tack with it.
Final thoughts

I’m so happy to have a complicated YET successful project under my belt! While it will probably be a while before I make this again, it’s certainly a pattern I can whole-heartedly recommend you try out if you’re looking to challenge yourself and up your sewing game a bit! You will definitely feel a sense of great accomplishment when you finish it!
Want to make one too? Get the Itch to Stitch Causeway Bomber on sale during release week!
Happy sewing! ❤


Love the extra info you provided for this pattern. Can’t wait to try it.
LikeLike
You’re welcome! Thanks for stopping by 💜
LikeLike
Great job with this jacket! I like that it is for woven fabrics. I may have to give this a try!
LikeLike
I think you’ll love this one!
LikeLike
This looks amazing! I just bought this pattern -did you add any form of interlining to add warmth or is it just the two layers?
LikeLike
Hi! I did not add any interlining to this one but it’s still plenty warm. If I wanted this to wear in winter though, then interlining would be a good choice. (I did consider doing one side in flannel but opted for twill on both… Many options!).
LikeLike
Thank you for your detailed review! I am planning to make this jacket with a scuba on one side and a ponte on the other and was trying to decide on sizing. In your PR review you mentioned that you could have gone down a size in the hip and from the photos it does seem that there is a bit more ease than I would have expected. I was already leaning toward not blending up a size for my hips since I’m using a knit fabric, and your experience has sealed my decision.
LikeLike
Glad this was helpful for you! With a knit I would definitely not size up at the hip.
LikeLiked by 1 person