
Welcome to Day 16 of the Mommy & Me Christmas Blog Tour, hosted by Seams Sew Lo! When I think “Mommy & Me,” my brain usually thinks “Mommy plus girl child,” but it was high time my son got some sewing lovin’ so the “me” today is my almost 4 year old boy child!
(Read to the end to enter our amazing giveaway!)

I have been gradually pulling together our Christmas outfits – this is something I don’t typically do, but since I tested the fancy Duchess & Hare Take A Bow Dress and had extra yardage leftover, I decided to make something for me and my son too. (Baby girl also has a Take a Bow Dress… still yet to be hemmed and photographed!!)
Assembling my son’s outfits took way longer than I had anticipated – I ended up getting sick, and the reality is that tailored clothes just take a long time!

My dress was relatively quick, though that was a drama in and of itself thanks to my serger light bulb burning a hole in my skirt when I was almost done!!!! I couldn’t believe it! I now have to work out how to patch the darn thing (I haven’t confirmed but I don’t think I have enough fabric left to make *another* circle skirt!). My skirt is also not hemmed yet…. My plan is to put some horsehair braid in it, and of course post some update pics very soon!
Now that my sob story is out of the way, let’s move onto patterns and fabric shall we? (It’s long, so I hope you have your coffee/tea ready! ;-))

Mommy: Petite Stitchery Rory Dress
(*Contains affiliate links!)
Petite Stitchery is one of our blog tour sponsors and graciously provided me with a complimentary copy of the Rory Dress* for this blog post. The black stretch velvet in the bodice is also from one of our tour sponsors, Aurora Designs. It’s so soft and comfy!
The dress is designed by Kelly Stevens, and it’s her first design for Petite Stitchery. The pattern is designed for knit fabrics, has a turtle neck, has various sleeve lengths, and can be made as a peplum or standalone skirt too.

Instead of a knit skirt, I used woven (Glitter Flocked Satin from Jo-Ann). I gathered the top with clear elastic (I use a European one called Framilon, available on Etsy*). I didn’t have to make any adjustments to the size since there was enough ease in the pattern piece already. I also addd a lining and sandwiched the bodice between the lining and the outer fabric.
For now, the lining is a God-send with that darn burn hole in the back!!

I forgot to measure the stretch in the velvet before I cut into it. After trying the bodice on, I noticed things were a bit tight. I realized that while the horizontal stretch was sufficient (75%), the vertical stretch was more like 30% (pattern called for 50%), so in hindsight I probably should have gone up a size. Thankfully I can *JUST* squeeze this dress over my head but I’ll definitely be doing my hair and makeup *AFTER* putting it on!

There were a lot of things in the instructions that I loved! I’ll list them out below:
- Bicep measurement! I rarely see this in a pattern and for me, it’s so helpful to have this info because my bust is always an extra small, but then the arms never fit because of my biceps! (Thank you weightlifting small children for 6 years!). Since my bust was extra small and my bicep was small and the difference between the two sleeves was about 1/2 inch, I decided to just add a 1/2 inch into the armscye on the back bodice, front bodice and sleeve pieces.
- Height! The pattern clearly stated that it was drafted for 5’5″ – 5’7″. I am about 5’8″ and since I knew I wanted to add horsehair to the hem (which would cause the skirt to lift a little), I decided to add 3 inches to the dress. I added an inch at the lengthening lines in the bodice, and 2 inches to the bottom of the skirt.
- A page for noting your adjustments
- A single page for a basic overview of instructions (plus the full tutorial for those who need it!)
Things that threw me off:
- There’s a cut list for arm bands, and instructions on how to sew them, but it doesn’t say what they are actually for — or at least, I couldn’t work it out! I presumed it was for a sleeveless version, because after inspecting the photos of long sleeved versions, I could tell they didn’t use that pattern piece.
- No line drawings. I love line drawings! Photos are great too (and there are lots in the instructions), but for seeing the basic details and options, I love me some line drawings!
Bottom line: The Petite Stitchery Rory Dress/Skirt is a great pattern to add to your collection, and the turtleneck provides great warmth in the cooler months.
Me: Oliver+S Art Museum Trousers & Vest, Sketchbook Shirt


(This is what happens when I try to kiss my kid!)
My little man is wearing THREE Oliver+S garments, each made with lots of time LOVE. I love Oliver+S patterns so much, but many of them are on the time consuming side thanks to beautiful finishes and details. If you do want to improve your sewing skills, I highly recommend picking up an Oliver+S pattern – each one is like a sewing lesson!

Since my boy is a basically a stick, I made sure to go by his measurements and adjust the patterns accordingly. His waist/chest measurement was size 18-24 month, and his height was 4T. So I veered on the side of caution and cut 2T in width for each pattern and lengthened each one to 4T. Having a selection of handy-dandy-rulers* was very helpful for this step – especially for the curves in the vest.

I’ve made the Sketchbook Shirt a few times (see here, here, and here), but this was my first time making it in the long sleeve version. For this one, I used a stretch polyester from JoAnn fabric. I love the feel of it – it’s very blousey and has a suede feel to it. I was worried that it would be too feminine, but I think for a dress shirt, it’s quite suitable. A couple of regrets though – I should have used 2 layers of interfacing – or a heavier duty type – in the collar – as it’s a bit floppy. I also marked my buttonholes with my yellow clover chalk line (which I usually love), but will those marks come out? I even bleached the darn shirt and STILL I have yellow marks!!!! UGH!!


Also, for the points in the collar and cuffs, I used a trick I learned from Kenneth D. King’s jean making Craftsy Class* – as he comes to each corner, he gets a piece of thread and sews just one stitch over it, keeping the needle down, then brings both sides of the thread to the inside of the stitch line (in front of the needle), pivots, and keeps sewing. Rather than clipping the corner, he folds the fabric at the corner, then holding both ends of the thread, he flips the corner out. The result is a perfectly pointed corner with no need for point turners, chop sticks, etc! And because you don’t trim off that corner, the point is also stronger.

This was my second time making the Art Museum Pants (first time is here) and first time making the vest. I wasn’t overly happy with my welt pockets on the vest, and so I was very hesitant about adding them to the pants (also because: TIME!), but I’m so glad I did put them on the pants because they were the most perfect ones I’ve done yet! I love how these pants turned out, though my biggest gripe is that they’re not lined, so you can see all the interfacing and pocket bags on the inside of the pant.
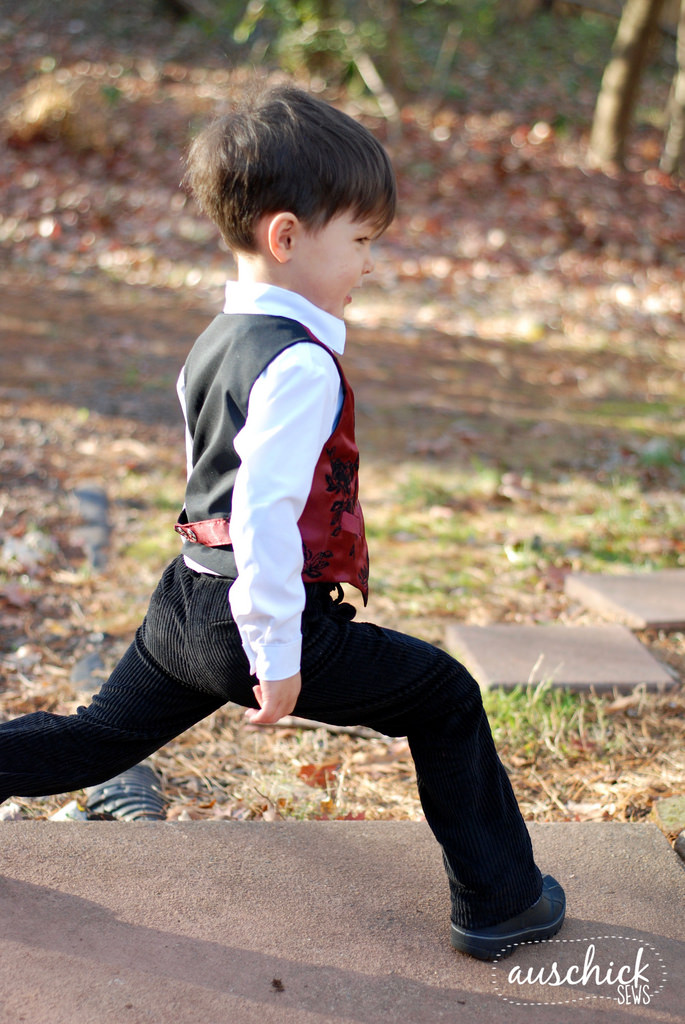
For the fabric, I actually stash busted something I’d had in my stash for like 20 years!! I had bought this black corduroy in a grab bag from Spotlight in Australia with the intent to make pants for my teddy bear (when I was in high school I was big into doll/bear/puppet making!). It’s so nice to finally use something up, especially when it’s been on your shelf forever!!

The Art Museum Vest was straightforward to make (once the welt pockets were done!!) and I used more of the flocked satin. I used black lining for the back and interior. The seams are fully hidden, so I actually didn’t use my serger on this one at all!

Wow, this was such a long post! I hope you enjoyed reading it and maybe even learned something too! Remember to join the giveaway and check out the rest of the amazing creations on this blog tour!

We would like to thank our Mommy and Me Christmas Outfit Blog tour sponsors! Please enter to win wonderful prizes in our Giveaway below!
![]()
![]()


Also, please visit all of the amazing Mommy and Me Christmas Outfit Inspirations in our Mommy and Me Christmas Blog Tour hosted by Seams Sew Lo below!
- December 4th: Seams Sew Lo
- December 5th: Katewillknit
- December 6th: Tenille’s Thread
- December 7th: That’s Sew Lily
- December 8th: Stitched by Jennie
- December 9th: Petite Stitchery & Co
- December 10th: Seams Sew Lo
- December 11th: kathys kwilts and more
- December 12th: Sewing with Sarah
- December 13th: Octaves of Color
- December 14th: My Crazy Crafty Beautiful Life
- December 15th: I Have Purple Hair
- December 16th: Nu Me NuYou
- December 17th: Frullemieke
- December 18th: Sewing Blue
- December 19th: Auschick Sews
- December 20th: Violets and Jewels
- December 21st: Seams Like Style
- December 22nd: Aurora Designs

Your Mommy and son outfits are amazing! I can’t believe your serger did that. I hope you can get the hole figured out, because that dress is just so pretty!
LikeLiked by 1 person
Thank you! I know! Ugh! This fabric has been really touchy though – it’s the first one I’ve also ever burned with the iron!
LikeLike
Love your dress! Sorry about the hole. How frustrating!
LikeLiked by 1 person
This looks amazing! I love that vest. Beautiful details are worth all the work. 😉
I’m going to remember that tip for corners, thanks for sharing!
LikeLiked by 1 person
Thanks! Hopefully I’ll make a video sometime for people who are more visual!
LikeLike
Beautiful job, Natasha! Sad that the fabric got singed..hopefully it’s an easy fix!
LikeLiked by 1 person
I hope so too!
LikeLike
Beautiful dress for you and what a great job on his little outfit. He looks adorably handsome in his tailored clothes. I love a good fitted vest for boys. 🙂
LikeLiked by 1 person
Thank you! I can’t wait to have them all dressed up in their outfits tomorrow!
LikeLike
Both of these outfits are amazing! That’s such a bummer about the hole (haha, I didn’t mean to do that, but funny how the mind works). I hope you find a way to patch it! And your son’s Oliver + S outfit is perfect. I love their patterns.
LikeLiked by 1 person
LOL I did end up patching it. Not the best, but it will have to do! And the hole is in the back so at least if people take photos of me or I look in a mirror, I won’t see it!
LikeLike
Did not know a serger light bulb could do that. It all still looks beautiful. 😀
LikeLiked by 1 person
I know right?! Ugh! I ended up patching it using a satin stitch. It looks ok but I kept it in the back of the dress so that I wouldn’t have to look at it when I was wearing it!!
LikeLike
You both look terrific even with some bumps along the way to getting there.
LikeLiked by 1 person
Thank you! Yes, it worked out in the end!
LikeLike
I love welt pockets – as long as there are good instructions to help! I’m so glad that you did add them to the pants as well, they add a bit more polush to the whole outfit.
LikeLiked by 1 person
Yes, these instructions were great – I really liked how she stitches the welt down without requiring any hand stitching.
LikeLiked by 1 person
I love your outfits! Great work! I’ve yet to do a mommy and son matching set but love the idea. Love the details about the patterns and fabric. Thank you so much for sharing!
LikeLiked by 1 person
Thanks! I hope you do! It’s fun to match our boys 🙂
LikeLike
it looks fantastic! I like how you chose to match your son–it works out great!
LikeLiked by 1 person
Thank you! He needs more sewing love haha
LikeLike
I love your dress and your little guy is so handsome in his outfit!
LikeLiked by 1 person
I LOVE you son’s outfit- all that time spent really paid off, and he’s quite a dapper young fellow in it! Such a bummer about the burn hole- I hope you find a way to patch it nicely, because it fits you so well!
LikeLiked by 1 person
I ended up patching it using a satin stick on my machine. Not super invisible but it will have to do! I kept the hole at the back so at least I won’t have to look at it!
LikeLike
Great post! Absolutely love your son’s outfit, I’ll be on the lookout for a video for the corner tip haha
I had almost the same feelings about the Rory dress instructions/included parts, especially the one page construction summary and missing a line drawing. Yours is gorgeous 😍
LikeLike
Lol, I’ll have to add the video to my list of new year resolutions haha! Thanks for stopping by!
LikeLike